A Guide for Managing Spam
This guide shows you how to automatically clean up and manage unwanted junk email using cPanel’s built-in Spam Filter, called SpamAssassin, together with the free and open source Mozilla Thunderbird email client.
Thunderbird will sort spam messages into your Junk folder directly on the server, while allowing you to “train” it on your local system to identify what is “Junk”, and what is “Not Junk”. This keeps your main Inbox clean, organised, and easy to read across all your devices, without the risk of any emails being deleted before you are satisfied they really are spam.
Understanding Apache SpamAssassin
SpamAssassin is cPanel’s built-in email filter. It analyses every incoming message across multiple criteria, including header structures, body text patterns, known spam signature databases, and DNS blocklists.
How the Scoring System Works
- Calculated Score: SpamAssassin runs a series of tests on each email. Each test adds or subtracts points, resulting in a single Spam Score. A higher score indicates a higher likelihood that the message is spam.
- Spam Threshold Score: This is the baseline score required for an email to be marked as spam. The default threshold in cPanel is 5:
- 1 to 4 (Aggressive): Catches more spam, but increases the chance of marking legitimate emails as false positives.
- 5 (Default / Recommended): Balances strong spam detection with low risk to legitimate mail.
- 6 to 10 (Passive): Only flags obvious or severe spam.
How SpamAssassin Flags Messages
When SpamAssassin deems an email to be spam based on your threshold score, it appends diagnostic background headers (such as X-Spam-Flag: YES and X-Spam-Score: 6.3), which email clients can act on. Additionally, it automatically prepends the string ***SPAM*** directly to the visible subject line of the email.
How to Enable SpamAssassin in cPanel
Tip: You can quickly locate any feature in cPanel by typing into the Search Tools (/) search bar text box visible at the top of the page.
- Log in to your cPanel account.
- Navigate to the Email section and click Spam Filters (or type “spam” into the search bar).
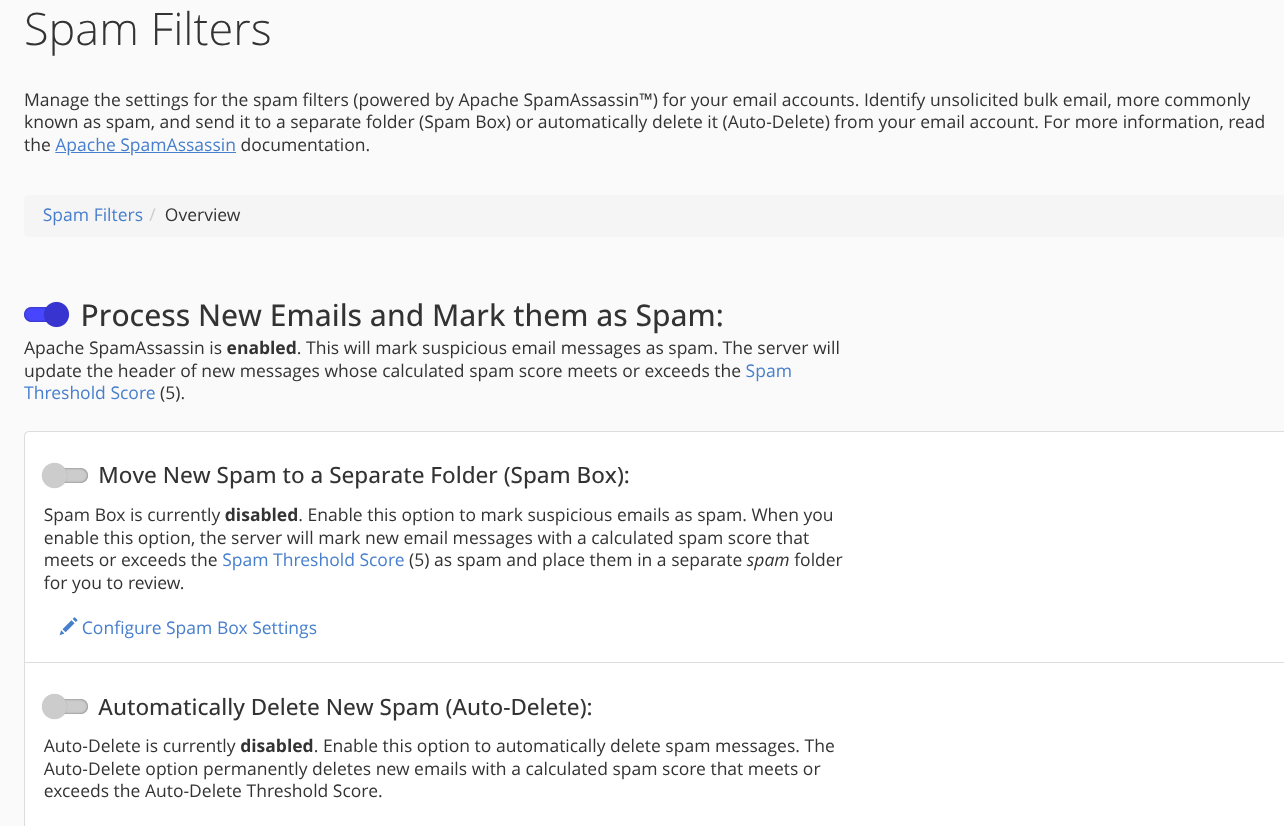
- Locate the option Process New Emails and Mark them as Spam (see screenshot below).
- Toggle the switch to On.
- (Optional) Click Spam Threshold Score to view or adjust your sensitivity level. For example, set to the recommended score of 5 (as in the screenshot).
Using Thunderbird to Manage Spam
In this setup, Thunderbird is used purely as an administrative tool to inspect, manage, and categorise spam messages directly on the server. As Thunderbird is configured, in this case, using IMAP, it gives you a real-time view of the server mailbox structure without taking permanent ownership of the storage.
This workflow allows you to use Thunderbird strictly for spam triage on the server, while continuing to use a primary email client (like Outlook or Apple Mail) on your local device to download and clear messages from the server using POP3.
Step 1: Download & Install Thunderbird
Download Thunderbird directly from the official website and complete the standard installation process for your operating system.
Step 2: Configure Account via IMAP
- Launch Thunderbird. If prompted by the setup wizard, select Email.
- Enter your full name, email address, and email account password.
- Thunderbird will attempt to automatically discover your server settings. Ensure that IMAP (remote folders) is selected as the protocol (do not select POP3 for Thunderbird).
- If manual setup is needed, verify the connection parameters:
- Incoming Protocol: IMAP
- Incoming Server:
mail.yourdomain.com - Port:
993(SSL/TLS) - Connection Security:
SSL/TLS - Authentication: Normal Password
- Click Done to finalise connection.
Note: As Thunderbird is being used solely as a read-and-triage interface for incoming server mail, configuring an Outgoing (SMTP) server is unnecessary. All outgoing emails will continue to be sent directly from your primary POP3 client. This keeps all Sent Items there, instead of some on the server (those sent via IMAP) and some in the POP3 client.
Step 3: Enable Thunderbird to use SpamAssassin’s Header Detection
- Open Thunderbird.
- Go to Settings (gear icon) > Privacy & Security.
- Scroll down to the Junk section.
- Under Trust junk mail headers set by, check the box and select SpamAssassin from the drop-down menu.
- Open your Account Settings (Tools > Account Settings > [Your Account] > Junk Settings):
- Check Enable adaptive junk mail controls for this account.
- Under Do not automatically mark mail as junk if the sender is in:, enable Personal Address Book. Note that Collected Addresses are addresses you’ve emailed, which I typically leave disabled.
- Check Move new junk messages to and choose the server’s Junk folder.
Step 4: Rapid Keyboard Shortcuts for Classification
When reviewing messages in Thunderbird, you can quickly train the filter and manage server-side folders using keyboard shortcuts:
- Press
jto mark a highlighted message as Junk (moves it to the Junk folder). - Press
SHIFT + jto mark a highlighted message as Not Junk (restores it to the Inbox).
Step 5: Installing and Configuring the “Spam Scores” Add-on (Optional)
To easily view SpamAssassin scores directly inside Thunderbird’s message list without opening full email headers, you can install the open-source Spam Scores extension.
- In Thunderbird, navigate to Menu > Tools > Add-ons and Themes.
- Search for
Spam Scoresin the top search bar. - Locate Spam Scores by Christian Zaenker and click Add to Thunderbird.
- Confirm the installation permissions when prompted.
- Select Extensions on the left.
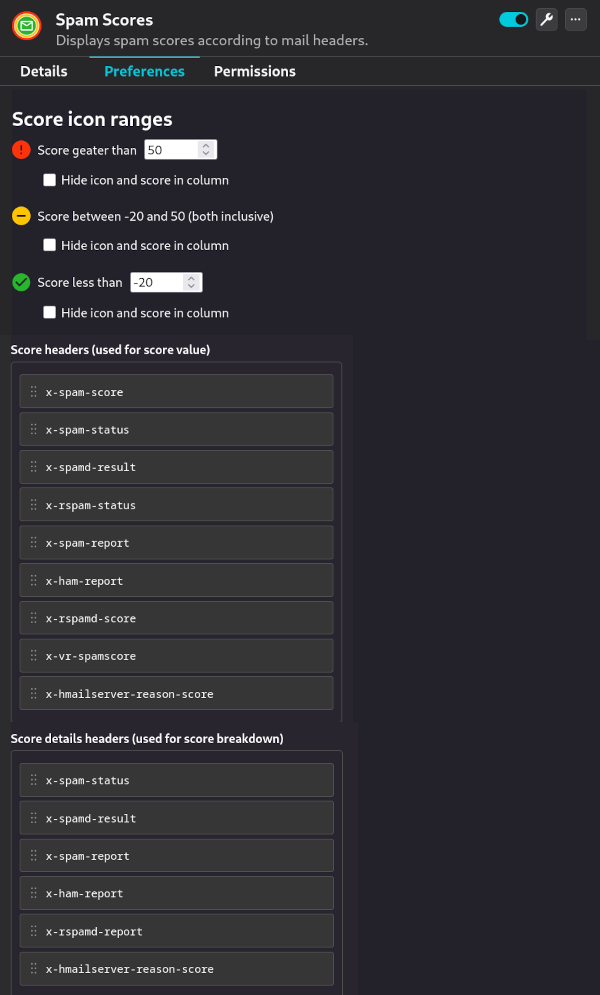
- Click Spam Scores and then the Preferences tab (or wrench icon) to configure the settings (see screenshot below):
- Score Icon Ranges: Set Score greater than to
50, Score between to-20and50(both inclusive), and Score less than to-20. - Score Headers (used for score value): Ensure
x-spam-scoreandx-spam-statusare moved to the top of the list. - Score Details Headers (used for score breakdown): Ensure
x-spam-statusandx-spam-reportare moved to the top of the list.
- Score Icon Ranges: Set Score greater than to
- Return to any mail folder (such as your Inbox or Junk folder).
- Click the Select columns to display icon at the far right of the message list header table.
- Check the boxes for SpamScore (shows numerical values) and SpamScore (icon) (displays visual indicators).
- Drag and drop the new column headers to position them in your preferred layout order (eg. to the far left).
Cleaning the Subject Lines
WARNING: Update 3 Aug 2026. The script in this section is experimental, and may exhibit issues, such as missing email. It is currently recommended to skip this section. However, the advice in the rest of this post is safe, and valid. This warning will be removed when the script is ready for production.
Unfortunately, false positives (ie. legitimate emails that have been incorrectly categorised as spam) will also have their Subject field modified with the ***SPAM*** prefix, which can be quite confusing. Thus, it can be helpful to automatically remove this tag from all incoming emails, relying purely on SpamAssassin’s background headers to identify and manage spam.
Follow these steps to clean the subject line before delivery.
Step 1: Create the Subject-Cleaning Script in cPanel
- In cPanel, open File Manager (under the Files section).
- Go to your home directory (
/home/yourusername/). - Click + File at the top left and name it
remove_email_spam_string.py. - Right-click
remove_email_spam_string.py, choose Edit, and paste the following code:#!/usr/bin/python3 # File: remove_email_spam_string.py # Version: 1.0 # Script to strip ***SPAM*** prefix and re-inject email into local Exim delivery import sys import email import subprocess import os from datetime import datetime LOG_FILE = os.path.expanduser('~/remove_email_spam_string.log') def log(message): try: timestamp = datetime.now().strftime('%Y-%m-%d %H:%M:%S') with open(LOG_FILE, 'a', encoding='utf-8') as f: f.write(f"[{timestamp}] {message}\n") except Exception: pass def process_email(): try: raw_data = sys.stdin.buffer.read() if not raw_data: log("Error: Empty stdin received") return msg = email.message_from_bytes(raw_data) # Prevent infinite loops: Check if already processed if msg.get('X-Spam-Cleaned') == 'YES': log("Loop prevented: X-Spam-Cleaned header already present") return # Mark message as cleaned msg['X-Spam-Cleaned'] = 'YES' # Strip ***SPAM*** from Subject subject = msg.get('Subject', '') if '***SPAM***' in subject: new_subject = subject.replace('***SPAM***', '').strip() msg.replace_header('Subject', new_subject) log(f"Cleaned subject: '{subject}' -> '{new_subject}'") # Re-inject into local sendmail process = subprocess.Popen( ['/usr/sbin/sendmail', '-i', '-t'], stdin=subprocess.PIPE, stderr=subprocess.PIPE ) stdout, stderr = process.communicate(msg.as_bytes()) if process.returncode != 0: log(f"Sendmail error (code {process.returncode}): {stderr.decode('utf-8', errors='ignore')}") else: log("Successfully passed to sendmail") except Exception as e: log(f"Unhandled exception: {str(e)}") if __name__ == '__main__': process_email() - Save the file and close the editor.
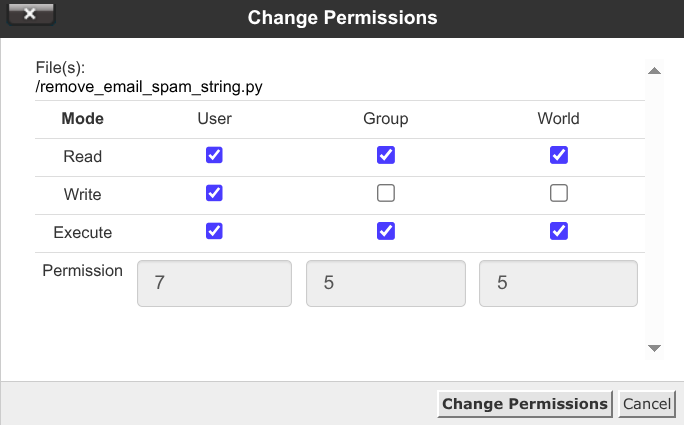
- Right-click
remove_email_spam_string.py, select Change Permissions, check the Execute boxes (setting permissions to 0755 orrwxr-xr-x), and click Change Permissions (see screenshot below).
Step 2: Set Up the Email Filter in cPanel
- In cPanel, navigate to Global Email Filters (for all addresses in the account), or Email Filters (for a single address).
- Click Create a New Filter.
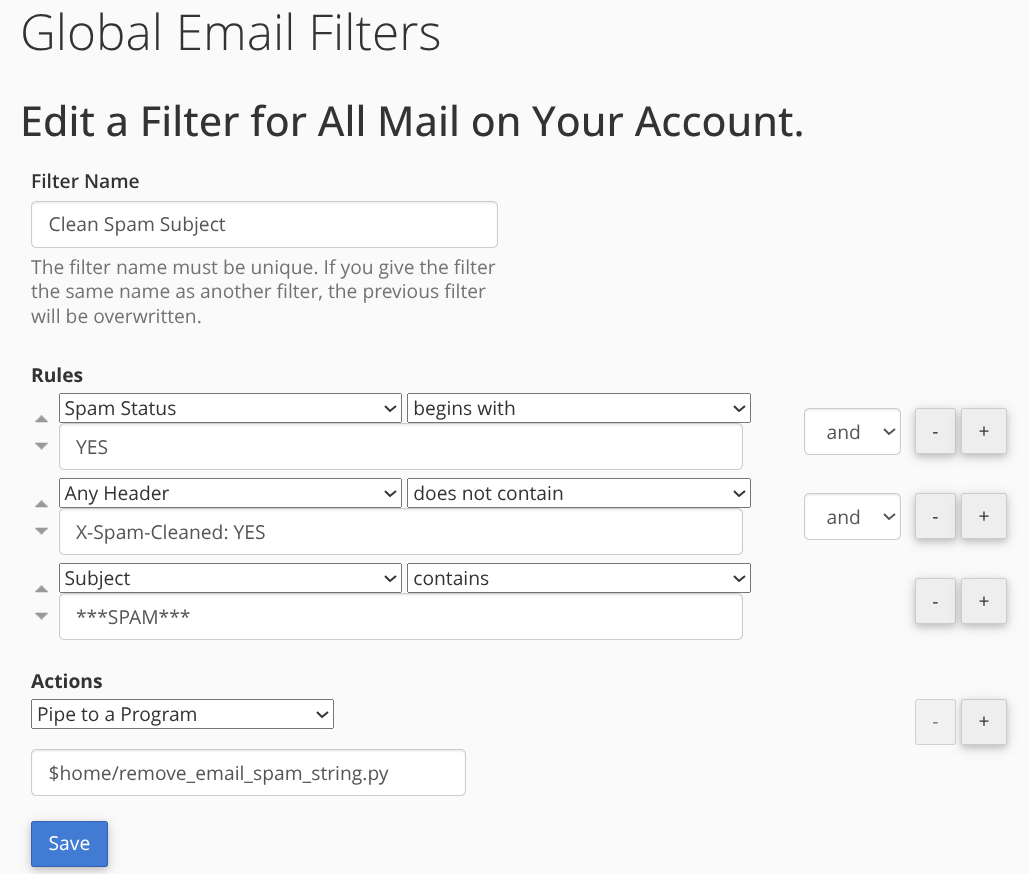
- Fill in the filter details:
- Filter Name:
Clean Spam Subject - Rules:
- First Rule: Select Spam Status > begins with >
Yes - Click the + button to add an and condition.
- Second Rule: Select Any Header > does not contain >
X-Spam-Cleaned: YES - Click the + button to add an and condition.
- Third Rule: Select Subject > contains >
***SPAM***
- First Rule: Select Spam Status > begins with >
- Actions: Select Pipe to a Program
- Path: Enter
$home/remove_email_spam_string.py
- Filter Name:
- Click Create or Save (see screenshot below).
Troubleshooting: Understanding Thunderbird Score Thresholds
Below are the relevant headers that have been added by SpamAssassin to two spam emails. You can view them by opening the email and clicking Menu > View > Message Source (or pressing CTRL+U).
Spam that was correctly moved to the Junk folder:
X-Spam-Status: Yes, score=11.3
X-Spam-Score: 113
X-Spam-Bar: +++++++++++
X-Spam-Report: Spam detection software,
 running on the system "host.owkdomain.com",
 has identified this incoming email as possible spam.  The original
 message has been attached to this so you can view it or label
 similar future email.  If you have any questions, see
 root\@localhost for details.
 Content preview:  Cloud Storage _ Subscription Renewal Cloud Storage
 Content analysis details:   (11.3 points, 7.5 required)
  pts rule name              description

X-Spam-Flag: YES
Subject: Your cloud subscription has expired and your storage is at 100
 percent capacity
X-Spam-Cleaned: YES
Spam that was not moved to the Junk folder (press the j key to mark it as Junk):
X-Spam-Status: Yes, score=7.8
X-Spam-Score: 78
X-Spam-Bar: +++++++
X-Spam-Report: Spam detection software,
 running on the system "host.owkdomain.com",
 has identified this incoming email as possible spam.  The original
 message has been attached to this so you can view it or label
 similar future email.  If you have any questions, see
 root\@localhost for details.
 Content preview:  _ Cloud _ Billing notice __
 Content analysis details:   (7.8 points, 7.5 required)
  pts rule name              description

X-Spam-Flag: YES
Subject: Your subscription renewal failed. Update your billing information.
X-Spam-Cleaned: YES
While both emails ultimately received the X-Spam-Flag: YES header, they triggered different behaviors in Thunderbird.
Notice the “Content analysis details” lines:
Moved spam: Content analysis details: (11.3 points, 7.5 required)

Unmoved spam: Content analysis details: (7.8 points, 7.5 required)
In this example, the server’s SpamAssassin threshold was set in cPanel to 7.5 (rather than the default of 5.0). This threshold determines the cutoff point at which SpamAssassin decides whether or not to append X-Spam-Flag: YES.
How Thunderbird Evaluates Spam Headers
When Trust junk mail headers set by: SpamAssassin is enabled, Thunderbird parses both the explicit boolean flag (X-Spam-Flag: YES) and the numerical score recorded in X-Spam-Status or X-Spam-Score.
- High-Scoring Server Match: The first email scored 11.3, which significantly exceeded both the server’s threshold (7.5) and Thunderbird’s internal confidence threshold. Thunderbird trusts the server header immediately and routes the email directly to the Junk folder.
- Borderline Server Match: The second email scored 7.8. While it passed the server’s 7.5 threshold, it fell near the lower boundary of Thunderbird’s built-in header parser. In these borderline cases, Thunderbird weighs the server flag against its local Bayesian adaptive filter. As the local database had not yet been trained on enough similar tokens, Thunderbird deferred action and left the message in the Inbox.
Training Thunderbird to Resolve Borderline Cases
You can quickly resolve these borderline cases using keyboard shortcuts:
- Press
jon an unmarked spam email in your Inbox to mark it as Junk. - Press
SHIFT + jon a false positive in your Junk folder to mark it as Not Junk.
Over a short period of active training (typically 50–100 messages), Thunderbird’s Bayesian filter learns the unique vocabulary of your legitimate correspondence versus your spam. Once trained, Thunderbird will automatically move those lower-scoring server-flagged emails to the Junk folder without requiring higher server thresholds.
When “Not Junk” Doesn’t Work
On very rare occasions (it hasn’t happened to me yet), a legitimate sender’s emails may keep getting marked as spam and moved to the Junk folder. In this case, adding the sender’s email address to your Personal Address Book will solve the issue.
Managing the Junk Folder
Once an email has been categorised as “Junk”, the Junk folder serves as a temporary store to give users a safety buffer to review and rescue any false positives before they’re permanently purged. In terms of Thunderbird’s spam training and categorisation processes, it’s safe to empty this folder at any time.
Tip: Spammers can be clever and evade even the best detection strategies. It’s important to check your Junk folder every day to ensure that you don’t miss any legitimate emails.
Mobile Email Clients
If you’re looking for a reliable, trustworthy and ad-free email client for Android, I use FairEmail.
While FairEmail, and other clients, can act on SpamAssassin headers using their custom filters, doing so would use a lot of extra battery and resources. Your mileage may vary, but spam filtering is currently much better suited to server and desktop environments.
If you only use mobile devices, meaning that managing spam in Thunderbird on a desktop is not an option, you could experiment with the cPanel “Spam Box” setting. This automatically moves emails with SpamAssassin scores above your threshold to the Junk folder directly on the server, without the need for Thunderbird. However, as there’s no ability to train cPanel for the types of “Junk” and “Not Junk” that you receive, persistent false positives and clever spammers must be explicitly dealt with using cPanel’s Spam Filters > Edit Spam Whitelist/Blacklist settings.
